Showing posts with label Blogger Guide. Show all posts

Monday, October 15, 2012

Guide to change your blogspot.com to dot.tk in Blogger

Are you publishing your blog with Blogger.com? Are you feeling that your long domain name like your-blogname.blogspot.com, giving you bad reputation at many points of view? If your answer is yes! Then you came to right place and read out my post.

Why should I change to custom domain?

Search engines except Google, rest of all will never result your blogspot well at their listing. Social networking sites don’t like your blogspot.com tag when compared with top level domain. They don’t love to back link you. Moreover, the blogspot.com domains are blocked by some Internet service providers including China. You can also get custom e-mail like admin@your-domain.com with Google Apps. So this time, I am posting step by step guide to set up a custom domain using Dot.tk.

Guide to set up a Dot Tk custom domain using free DNS service:

Registering Dot Tk Domain:

Step-I:
  1. Go to Dot.tk website.
  2. Enter your preferred Dot Tk domain name and click Go. If entered domain is available, you will be promoted for further steps.
  3. Dot Tk domain registration panel
  4. Now it shows availability of your domain.  For free domain you need to produce minimum of 25 hits per 90 days. Free domain has same services as paid domain. Select your choice and move on to next step.
  5. Dot tk sign up
  6. Enter your blogspot URL and set registration length as 12 months. Now sign up with Dot Tk. Here you have to verify your Dot Tk account by email or you can also use social Networking accounts like facebook, yahoo, flicker etc.

Dot Tk settings in Blogger:

Step-II:
  1. Log on to your blogger account.
  2. Adding custom domain
  3. Go to Settings and find Publishing option in your dashboard. Now click on Add a Custom Domain. You will be prompted to buy a domain for your blog.
  4. Blogger custom domain settings
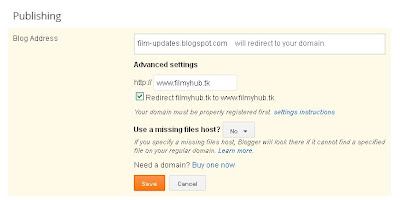
  5. Simply click on Switch to advanced settings. Then enter your Dot Tk domain with www in the place of www.filmyhub.tk (as shown in the picture). Now you have to verify domain ownership by adding two CNAME records. For this, click on Settings instructions. You will be landed to a page that having dynamically generated CNAME valus with detailed set up instructions.

DNS Configurations in Dot TK:

Step-III:
  1. Now log on to your Dot Tk account and click on Domain Panel. It gives the list of your Dot Tk Domains. Now, click on Modify option to configure DNS Settings for your domain.
  2. DNS settings in DOT TK
  3. Here, you will get a pop up window of Domain settings. Select Dot TK DNS Service and configure your DNS settings like above shown screenshot according to your domain name. You will find dynamically generated CNAME values in below image.
  4. DNS settings in Blogger
  5. For the first CNAME, enter Host Name as "www" and IP address as "ghs.google.com". It is fixed for any blog. Second CNAME record needs dynamically generated values. It means Host name with dynamically generated name (which is highlighted in blue) and IP Address with dynamically generated value like "gv-xxxxx.domainverify.googlehosted.com" (which is highlighted in pink). These fields are different for different blogs. Do not forget  to select record type as CNAME record.
  6. To make your naked domain available, you have to add A record with following details. select record type as A record, then fill Host Name field with your dot tk domain without www (example: filmyhub.tk ) and IP address as 216.239.32.21
  7. Before you move onto next step, wait about 30 min or an hour for your DNS settings to activate.

Saving Custom Domain settings in Blogger:

Step-IV:
  1. Again go to advacned settings that configured in second step under publishing and save them. If you get any error, come back after some time and save settings.
  2. custom domain settings in Blogger
  3. Once you are done with saving, under publishing edit your custom domain and set redirection option by putting tick mark as shown in picture.
  4. If you have any trouble in following any step, put a comment that helps me to catch you back.

Sunday, September 30, 2012

Fix 404 Page Not Found Error with redirection in Blogger

You will often notice that visitors come to a page which doesn't exist on your website, either by clicking a broken link (unreachable link) or typing a wrong URL. Typically, this may result bad user experience. As a webmaster, it is our concern to avoid misleading with a status message.  In Blogger, page not found site errors can be identified with the help of Google Webmaster Tools. It also works for any website that capable of verifying ownership with Google webmaster tools.  If you encounter an error, then the next step is putting it in right direction. In order to resolve the error, we will employ following error handling mechanisms in Blogger.
  • Blog's custom page not found message
  • Blog’s custom redirects
Organization of errors can be done easily in updated blogger interface. Please note that you won't find any options in older interface.

Set custom 404 Page message in Blogger:

1. Go to Blogger and open your blog Setting in Dashboard
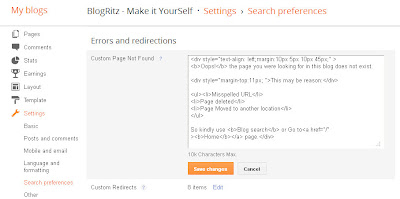
2. Under settings click on Search preferences. There you will find Errors and re-directions.
3. Now edit Custom Page Not Found option and enter the message which you would like to notify your users about the error page.
Custom 404 page settings in Blogger
Custom 404 page will be displayed only to the visitors who come with 404 HTTP status code. Instead of message, you can use HTML, as well as CSS code up to 10k characters. If possible, try to put search box within the message and provide link to most popular articles or posts. This method is perfect solution for the visitors who came with a mistyped URL.

Set custom redirects in Blogger:

So far we have discussed about Custom 404 page, Now it's time to fix errors related to deleted or removed pages or posts.
1. For this edit Custom redirects option in Search preferences.
2. Then click New redirect and enter non-existing or removed post URL path followed by root domain in From block.
3. Next enter the URL path followed by root domain in To block to where you would like to redirect.
Custom redirect settings in Blogger
This option will helps you to drive your old visitors to new relocated page or home page. But It is not compulsory to fix all 404 errors with redirection. Because you may not able to control every link to your site. Moreover it doesn't affect your site search performance. So just try to fix every 404 error listed in Webmaster Tools or top-ranking related issues. Have any feedback or query? if yes, then post a comment.

Friday, June 8, 2012

How to Choose the Right Niche or Topic for Your Blog

When you are in a thought of starting a new blog, you will face a question – “what to write about?” In general, many bloggers get struggled over deciding the topic (niche) of their blogs. So I am providing a guide to select the right topic and to analyze the factors that influencing the success rate of blogging. You should remember that measure of your success will depend on your niche and its organization. Finding a right Niche is the important and difficult task for bloggers that reflects on future steps.

Tips to select the right niche or topic for the blog:
1. Make a list of your interests that you are passionate about. List should contain the topics which suit you best. Then only you can put your potential to build up your blog.
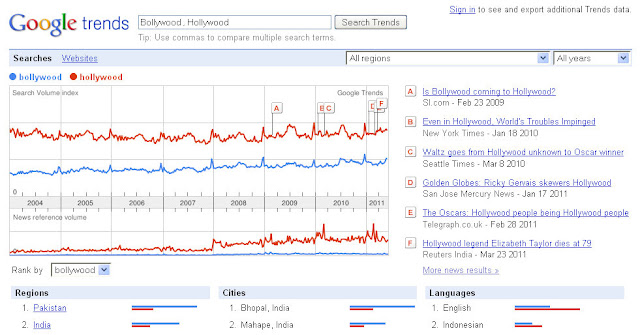
2. Shrink out the list by analyzing the search volume at Google trends. Make some searches on Google trends for different terms involving your niche and compare them. Check whether the topic you have chosen has been growing or shrinking.
Google trends model search
Google Trends: explores a portion of Google web searches to figure how many searches have been done for the entered keyword, relative to the total number of searches done on Google over time. A graph will be shown According to entered key term. Go to Google Trends Here.
3. “Competition” - Always keep it in your mind. Niche with high popularity will give you great challenge to compete on search engines to rank well. In this case you need to work hard to rectify the previously posted methods by pointing gaps and advanced methods, matters whatever it is. It is only the way to sustain the competition and you should be hot otherwise it can ruin you totally. For less popular topics competition will be less. So we can easily acquire top position for that niche. Being at the top of search result, you can turn good traffic. So it is better to select unique niche for better result.

4. If you are interested in making the blog monetize. Then you will need to estimate CPC (cost per click) and competition of ads using Adwords keyword tool, which are based on Google Adsnese statistics. Also make sample searches on Google, Yahoo and Bing and observe the density of advertisements shown in the search result. More ad density gives more profit.Do you find my data helpful? Add a comment as your feedback.

Tuesday, June 5, 2012

Easy ways to promote your Blog post in Effective Manner

Blog promotion and backlinks
Writing a post is an easy task for bloggers, when compared to making it popular. In general, many bloggers will just publish their articles but they won’t promote. Actually promotion techniques plays important role in the production of pillar posts. Pillar posts are the posts, which drives huge traffic and are attractive for readers. The main aim of this post is to increase volume of visitor, backlinks and to improve pagerank at search engines.

Various methods for promoting your post:
  1. Submit your articles to Top ranked Social Bookmarking Websites like Digg, Reddit, Delicious, Slashdot and Technorati.
  2. Share your post links in Top Social Networking sites like Facebook, Orkut and Twitter.
  3. Submit your URL to Top Blog Directories.
  4. Approach other bloggers who have same niche and comment on their posts providing your post URL with proper anchor text. Your comments should be relevant and useful for other visitors. Avoid spam links.
  5. Actively participate in forum discussions related to your blog topics, leave helpful comments, discuss hot topics in your niche and suggest your links there.
  6. Make use of free webmaster tools of GoogleYahoo and MSN.
  7. You can also promote your blog in offline mode by telling to your friends and neighbors.
Note that promoting every individual post results better than promoting home page URL.
Avoid attempting to promote each and every post; go for big and interesting posts only.

Monday, June 13, 2011

Blogger Announced Mobile Templates for Better Browsing

In today’s world smart phones have become a vital part of our lives, as the technology increasing rapidly. Mobiles made it easy to access Internet and to browse WebPages at every corner, at our homes and workplace. This made web designers to code separately for mobile devices. Already some websites like facebook, twitter and orkut have both web version and Mobile version. Mobile version makes mobile viewers to browse in more flexible way. Now it’s Blogger’s turn. It has launched Mobile Templates. By the help of Mobile Template, we can make our blog to look great on mobile devices with a mobile-optimized version of our current blog template, hosted on Blogger. Mobile Templates serves Blogger blogs to load fast and fully on small screen of smart phone.

How to configure Mobile Templates for Blogs:

1. Go to the Dashboard -->> Settings -->> Email & Mobile tab.
2. Enable the mobile template option.
Here you can also preview your blog before using the mobile version.
Feature highlights of Mobile Templates:
  • It makes your blog smartphone-friendly.
  • Mobile version will be displayed by automatic redirection when your blog accessed from smartphones.
  • Presently, all 27 Designer Templates are supporting and some gadgets. For non designer and customized Template blogs default generic template version will be displayed.
  • Mobile ads also displayed at the top of the post pages and at the bottom of the index page if the blog has an Adsense gadget or in-line blog ads.

Wednesday, June 23, 2010

Guidelines to create Quality content on your Blog

Blog posting guidelines
If you follow my guideline in writing posts, then I am sure that you will definitely notice a good progress. My guidelines involve the improvement of site performance, page rank on search engines, image optimization and content of post.

Post Title or Article Title: Title should be descriptive, accurate and unique and it should point the topic or central idea of particular post. It is better to express title in 5 to 10 words. Don't create titles for search engines i.e. filling title block with keyword not related to content.

Post content or Body of the post: It elaborates the theme of article in detail, so write introduction to concept of your post at the beginning and describe in your own words. You should educate visitors on your concepts by defining the concepts or keys of the article and give examples. It experience good for readers. If you add an image, then it looks perfect and gives good impression. Provide relevant description. Avoid copying content from other internet source. It does not add values to your post. Search engines detect your content as duplicate and never result your site well so make a habit of writing post in your own words. Make sure that your pages have no grammatical mistakes.

It is important to note that topic should be fresh, useful, live and information-rich and then only your site gets popular, earns backlinks and brings more traffic. Post articles on your site at least twice or thrice a week. Avoid placing unnecessary codes and scripts on your page.

Image search optimization:
  • File name should be informative and related to image. Suggested file names are like blogger_logo.jpg, but not IMG0058.JPG.
  • Make use of alt attribute to provide a small description of image.
  • Provide Good quality photos and compress their size.
  • Specify a width and height for all images in their code.

Wednesday, December 9, 2009

How to create a Blog - Blogger

Before creating a Blog, You should know what is a Blog. A blog is a web site, where you write stuff on an ongoing basis. It is a platform to collect and share things that you find interesting and whatever you want with your friends and the world. It gives you own voice on the web.

Come to main point - "how to create a blog"

1. Open Blogger.com and click on create a blog.


2. Create a Google Account using your existing e-mail. If you already have a Google account perhaps from Gmail, Google Groups, or Orkut ; Use that username and password. Now click on Continue .

3. Give Blog Title and Blog address (URL) . Click on Continue.


4. Choose a Template and click on Continue. Your blog is created. Now you can post anything you want.